
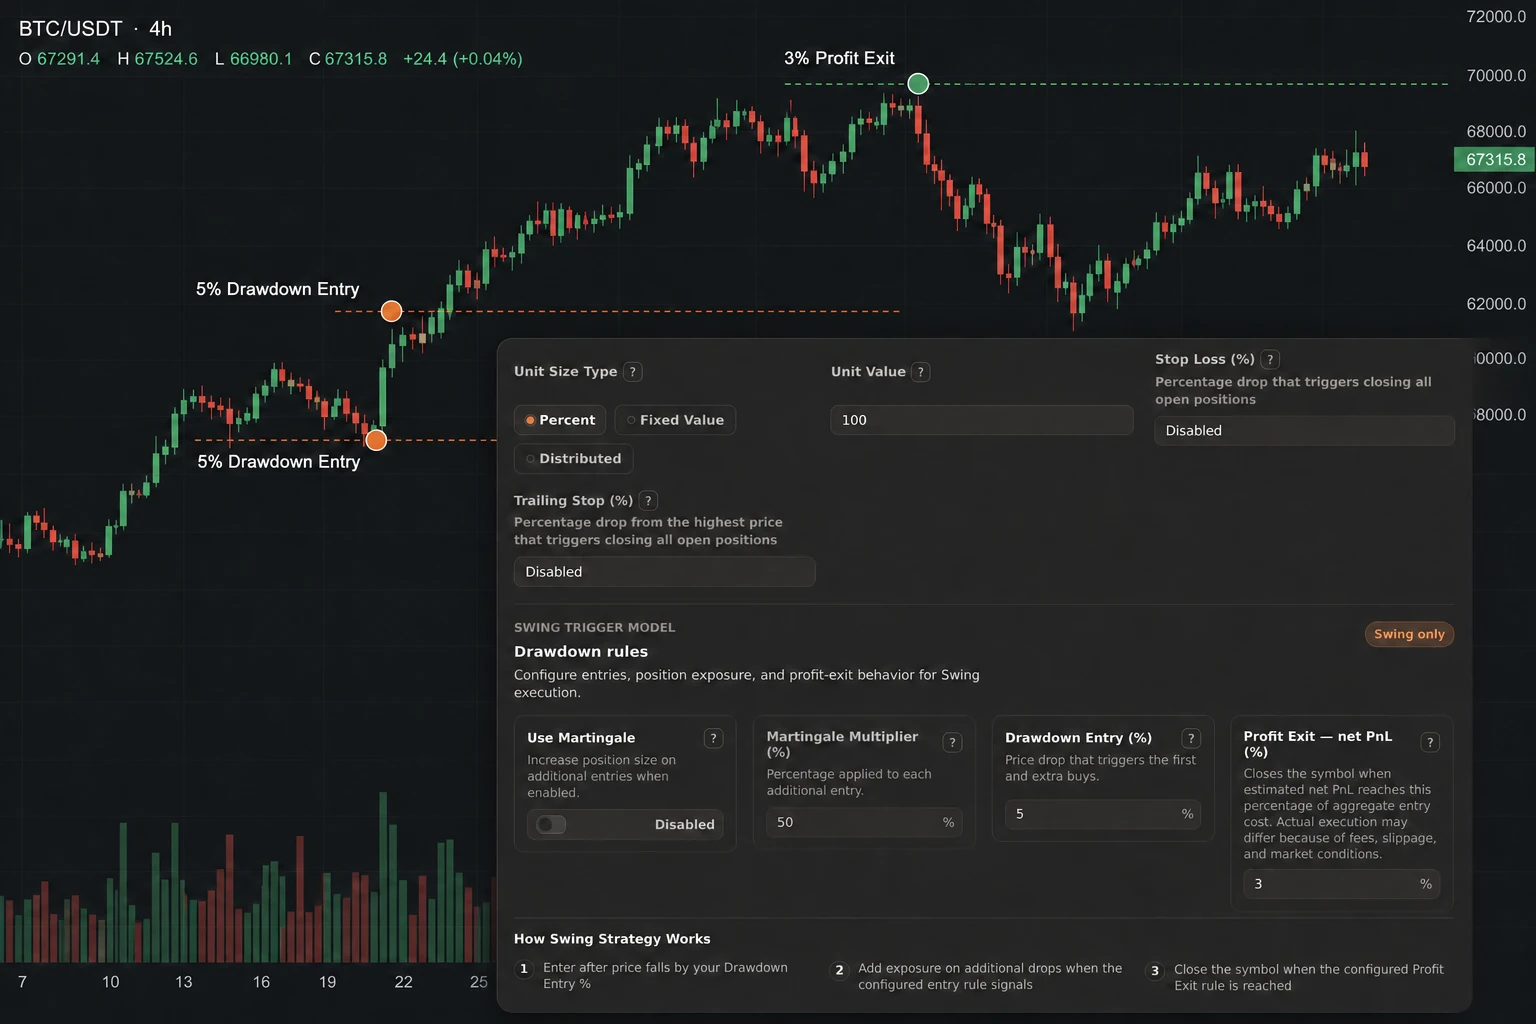
A Swing strategy is easier to review when its entry, sizing, and exit rules are treated as separate decisions. In Gimmer’s current Strategy Builder, the Swing path exposes those decisions directly: configure when a drawdown can trigger an entry, decide whether position sizing should change after losses, define the exit threshold, and then use a backtest to inspect the historical behavior of that configuration.
This is a configuration guide for crypto swing trading in Gimmer’s Spot execution path. Margin mode has different direction, leverage, and collateral behavior and is outside this article’s scope. The guide does not predict market direction, recommend a percentage, or turn a historical backtest into a promise about a future cryptocurrency strategy.
Start with the Swing engine and the market context
Open the Strategy Builder and choose Swing as the decision engine. For the workflow covered here, use the Spot execution path. Before adjusting the Swing-specific fields, review the surrounding market context: exchange, timeframe, quote currency, base assets, order type, and unit size. Those selections define the context in which the strategy will be saved and later evaluated.
Keep the first review narrow. You are not trying to make a crypto trading bot “ready” by filling every field with an aggressive value. You are recording a testable set of assumptions that you can inspect again when the backtest finishes.
Use Drawdown Entry to define the trigger you are testing
In this Spot-scoped guide, Drawdown Entry (%) is an entry threshold used for the first drawdown-based long entry and later entries when the configured drawdown condition is met. It is not a risk limit or evidence that a decline will reverse; price can continue moving against the strategy after the condition is met. Review it alongside unit size, the separate stop controls, and the historical period being tested.
Decide whether Martingale belongs in the test
Gimmer exposes an optional Use Martingale control for Swing strategies. When enabled, Martingale Multiplier (%) increases the quote amount used for a subsequent entry relative to the previous position-sized entry. It can increase exposure after losses; it does not improve the probability of recovery or guarantee an exit.
If you enable it, record the exposure boundary you will review. If you need a baseline, compare the same configuration with the control disabled; disabled removes the multiplier but does not mean that additional entries cannot occur.
Do not read a larger position as evidence that the strategy is more likely to recover. It changes the size of subsequent entries, which can change both the historical result and the amount of capital exposed while the position remains open.
Review Profit Exit — net PnL (%) as a close condition
For a new or explicitly updated Spot Swing configuration that shows Profit Exit — net PnL (%), the value is a percentage of the symbol’s aggregate entry cost. When estimated net PnL reaches the configured threshold, Gimmer requests closing the symbol’s open positions. The request can remain pending, partially succeed, or fail, and realized results can differ because of fees, fill price, slippage, liquidity, or exchange response.
This is a close condition, not a guaranteed return, execution price, or loss limit. If a saved strategy shows a different Profit Exit label or a compatibility warning, review that saved configuration before comparing it with this guide or a newer backtest.
Review the separate stop controls
The entry and Profit Exit conditions do not replace the builder’s separate Stop Loss (%) and Trailing Stop (%) controls. Each can be disabled. When enabled, the control defines a separate close trigger; its selected signal or time mode governs when re-entry can resume after that exit. Review the thresholds and re-entry modes separately. Neither guarantees an exit price or prevents loss.
The safest public interpretation is operational: these fields describe how the configured strategy is intended to react under the rules selected. They do not prove that a future run will execute at a particular price, avoid loss, or behave the same way as a historical test.
Save the configuration, then backtest the exact version
When the configuration is coherent, save the strategy before moving into the Backtest tab. Use one clearly named version for the first run. If you change Drawdown Entry, Martingale, Profit Exit, unit size, or a stop mode, record that as a new comparison rather than relying on memory.
Read the backtest as historical evidence about the selected period and data. Inspect the historical result and run metadata, then return to Config to compare the saved fields. Review drawdown, position, and exit behavior, and note the conditions that the run does not cover. A backtest can help you review a configuration; it cannot predict a future crypto market or certify a live trading outcome.
A pre-flight checklist for a Swing strategy
- Is Swing the engine you intended to test?
- Are exchange, timeframe, quote, base assets, execution mode, order type, and unit size explicit?
- What drawdown condition is represented by Drawdown Entry (%)?
- Is Use Martingale intentionally enabled or disabled?
- If it is enabled, have you reviewed how a changed subsequent-entry size changes exposure?
- Does this Spot configuration show Profit Exit — net PnL (%), and are you treating its value as a close threshold on estimated net PnL rather than a promised return or fill?
- Have Stop Loss and Trailing Stop been reviewed separately?
- Did you save the intended version before running the backtest?
- Will you treat the result as historical evidence rather than a prediction?
Configure first, then review the evidence
Gimmer’s Spot-scoped Swing workflow gives crypto strategy builders a concrete place to express drawdown entry, optional position-sizing changes, and close conditions. The useful next step is disciplined review: save one explicit configuration, run a backtest, and read the result with its drawdown, exposure, and limitations in view.
Open the Swing Strategy Builder, document the rules you intend to test, and use the backtest to review that configuration before making any decision about a live workflow.