
It is easy to look at an API path and assume the hard part is over. Usually the opposite is true. A route name tells you where the request goes, but it does not tell you enough about the auth model, the required fields, the likely refusal states, or the smallest safe test to run first. Gimmer’s native endpoint-detail panel exists for that exact moment. Click the path you actually need, inspect the contract that belongs to it, and make the first request only after the panel has answered the obvious questions.
This workflow starts after you already know the docs page is the right surface. It is not a tour of the whole API. It is the smaller decision that happens once you are already in #/docs and need one exact route.
Start With The Exact Path, Not With A Vague Goal
The safest API habit is smaller than most people expect.
Do not start with a broad idea like “I need the strategy API” or “I need the backtest routes.” Start with the exact call you are about to send. On Gimmer’s docs page, the endpoint matrix lets you take that narrower step deliberately. You choose the route family, click one path, and bind the page to a concrete request contract instead of staying at the category level.
That matters because API mistakes often happen before any payload leaves the client. The reader confuses one route for another, assumes a field is optional when it is not, or sends a larger test than the moment requires. The docs panel is useful precisely because it narrows that first decision.
What The Endpoint Panel Tells You Before You Call
Once you click a path, the page stops being a broad reference shelf and becomes a route-specific checklist.
| Panel area | What it answers | Why it matters before the first request |
|---|---|---|
| Auth and scope | What auth model the route expects and which scope label applies | It helps you confirm whether you are about to send the request through the right credential path. |
| Parameters and input DTO | Which values the panel documents in the path or body and which fields it marks as required | It reduces the chance of treating the request body like a guess. |
| Example request | A baseline request shape for the selected route | It gives you a smaller starting point than inventing the first call from scratch. |
| Response states and output DTO | What success, refusal, and the documented payload shape look like in the panel | It helps you compare the result against the contract instead of overreading a single status code. |
| Checklist | The smallest safe route-specific test to run first | It keeps the first verification step narrower and easier to trust. |
The panel does not need to predict the whole integration to be useful. It only needs to answer the most immediate contract questions before the request leaves your side.
Use One Route As The Anchor Before You Generalize
A good way to use the page is to stay concrete.
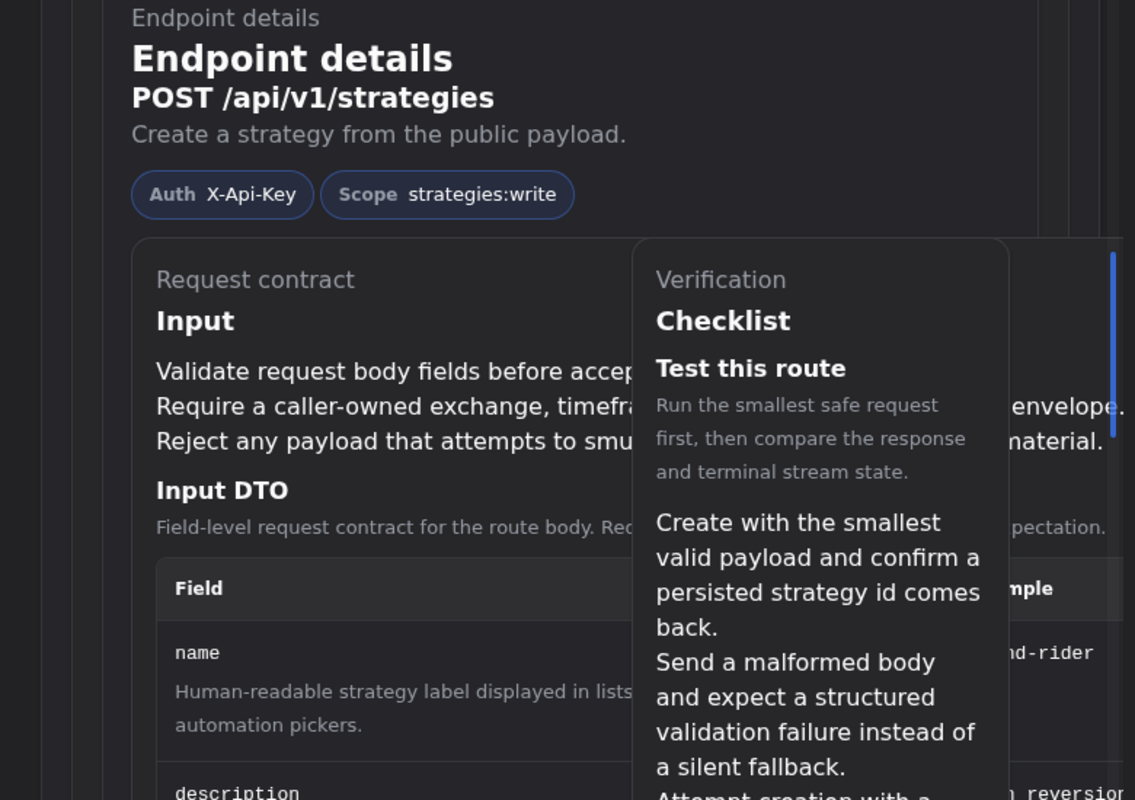
A route like POST /api/v1/strategies makes this habit easier to see in practice. Once you click it, the selected route shows the endpoint title, request highlights, input fields, response highlights, response states, output fields, and a route-specific checklist inside the docs page itself.
That is enough to teach the workflow without overstating it. You do not need to claim that every route is identical in order to show why the panel is valuable. You only need to show that the page already supports a route-by-route inspection habit that is calmer than guessing from the path name alone.
Read Auth And Scope Before You Read The Example
Many readers jump straight to the sample payload. That is usually too late in the sequence.
The first useful question is simpler: what kind of access does this route expect? The endpoint panel puts auth and scope in the metadata area for a reason. If you skip that step, you can end up testing the right path with the wrong access model and then misread the refusal as a route problem instead of an access problem.
This is also where the article needs restraint. A visible auth label is not the same thing as a full setup guide. It tells you what contract the route expects. It does not promise that your current environment, token, or session is already correct. That difference is exactly why the panel is useful: it helps you inspect the contract before you assume your execution context is ready.
Use The Input Section To Shrink The First Request
The request contract section is most useful when it makes the first test smaller.
The input highlights, parameter chips, and input DTO fields tell you which parts of the request belong in the URL, which belong in the body, and which fields the panel marks as required or optional. That is better than treating the first request like an experiment with a dozen assumptions hidden inside it.
The example request also helps, but only if you read it as a baseline. It is there to show the current contract shape, not to become a blind copy-paste ritual. The trust-safe habit is to compare your planned request to the documented shape, trim it to the smallest safe test, and then send it deliberately.
Read Response States, Not Just Success Cases
A lot of false confidence comes from reading only the happy path.
Gimmer’s endpoint-detail panel is more useful because it does not stop at the request. It also names output highlights, response states, and output fields. That helps the reader treat validation refusal as part of the contract instead of as an unexpected exception to it.
If the page shows a success state and a refusal state, both are part of the information you should use before testing. One tells you what an accepted request should return. The other tells you how the route can refuse a request when the payload or access context is wrong. That difference matters because many avoidable mistakes come from sending the first request without deciding what a refusal should look like.
The Checklist Is The Most Practical Part
The checklist may be the smallest section on the page, but it is often the most operationally valuable one.
Its job is not to replace QA or integration testing. Its job is to tell you what the smallest sensible proof looks like for this route. That keeps the first step measurable. Instead of jumping into a large or irreversible request, you can validate the contract with a narrower call and compare the result against the documented request and response shape.
That is a better pre-request habit than optimism. Small verification steps are easier to explain, easier to repeat, and easier to correct when something does not match the contract you expected.
What This Panel Does Not Promise
This article is intentionally narrower than “how to use the whole API.”
- It does not promise that reading the panel guarantees a successful live request.
- It does not replace approval, permissions, or wider workflow testing.
- It does not turn one example request into a universal template for every environment.
- It does not make the native panel a substitute for the live backend contract or handler-level verification.
- It does not make the broader docs workspace article obsolete; it simply narrows the focus to one route-specific decision point.
- It does not claim that every route family is identical just because one clearly documented route shows the full panel shape clearly.
Those limits make the article more trustworthy, not less useful. The goal is not to make the docs page sound magical. The goal is to help the reader make one better request decision at a time.
A Safe Pre-Request Routine
If you want a practical routine, keep it small:
- Open
#/docsand choose the route family you actually need. - Click the exact path you are about to call.
- Read the auth and scope labels before you read the example payload.
- Use the parameters and input DTO to trim the first request to the smallest safe test.
- Read the response states so you know what acceptance and refusal should look like.
- Use the checklist before you send anything larger than the first validation call.
That routine is modest on purpose. It gives the docs page a real operational role without asking it to prove more than it currently proves.
Final Thoughts
The most useful docs habit is not memorizing every endpoint. It is learning how to slow down at the exact moment when a route becomes real.
In Gimmer, the endpoint-detail panel is built for that moment. Click the path, inspect the contract, read the refusal states as carefully as the success case, and let the checklist shrink the first test. That is how a docs page becomes a safer execution tool instead of a decorative reference.
Open #/docs, choose the route family you actually need, click the specific path, and read the input, output, and checklist details before you send the first request.
– The Gimmer Team